Nugroho's blog.: android
Showing posts with label android. Show all posts

Tuesday, November 10, 2020

Membuat Media Pembelajaran di Android

Berikut adalah daftar link video tutorial singkat pembuatan aplikasi Android untuk pembelajaran. Ada dua pilihan alat bantu dalam pembuatan video ini yaitu MIT App Inventor dan Kodular, silakan dipilih salah satu. 

Penjelasan tentang MIT App Inventor dan Kodular, baik  persamaan dan perbedannya dapat diakses di link ini.

Kodular.

MIT App Inventor.

Membuat Aplikasi Android Menggunakan Kodular dan MIT App Inventor

Android memiliki peluang besar untuk digunakan sebagai media pembelajaran sekolah baik SD, SMP, SMA, SMK.

Portabilitas dan sifat alaminya yang selalu diakses oleh semua orang hampir tiap saat menjadikan gagdet ini media yang sangat tepat untuk itu.

Tetapi kita kan harus belajar bahasa Java dulu untuk dapat membuat aplikasi .apk di Android. Itu dulu, sekarang tidak lagi. Banyak aplikasi IDE yang memungkinkan kita untuk membuat aplikasi android dengan mudah, beberapa diantaranya adalah MIT App Inventor dan Kodular.

Kedua aplikasi tersebut berbasis web, jadi dapat digunakan tanpa menginstall apapun di komputer. Tentu saja komputernya harus terhubung internet dan memiliki web browser seperti Chrome, Safari, Opera, atau Firefox.

Kodular dan MIT App Inventor juga membebaskan pengembang aplikasi dari rumitnya bahasa pemrograman. Alih-alih diprogram dengan kode berbasis text,  kedua aplikasi ini menggunakan puzzle untuk pemrogramannya.

Secara umum, fitur keduanya sama:
  • menggunakan drag-n-drop untuk menambah obyek (tombol, label, gambar),
  • menggunakan puzzle sebagai pengganti penulisan teks kode program,
  • menggunakan app companian untuk melihat di layar android  ampilan  aplikasi yang sedang dikembangkan secara langsung, MIT AI2 Companion dan Kodular Companion di android (dapat diunduh di PlayStore)
  • dapat diimport menjadi format .apk.
Beberapa perbedaan:
  • MIT App inventor menyediakan android emulator, sehingga tampilan aplikasi dapat langsung dilihat di komputer tanpa terhubung ke gadget android sebenarnya.
  • Kodular memiliki fitur assets yang pada beberapa skenario dapat digunakan untuk meng-embed file pdf di .apk sehingga tidak perlu menyertakan file-file pendukung secara terpisah. Hal ini sangat penting saat, misal, kita memiliki materi pembelajaran berupa file pdf.
Berikut adalah contoh pembuatan aplikasi di MIT App Inventor dan Kodular


Friday, August 19, 2016

Independent Wireless Multitasking LEDs blink using Arduino FreeRTOS


and send the data wirelessly using bluetooth module HC-05. :)


http://ift.tt/2bi4MpP.
The code
#include <Arduino_FreeRTOS.h>
#include <SoftwareSerial.h>
SoftwareSerial mySerial(10, 11); // RX, TX

int n = 0;

// define two tasks for Blink & AnalogRead
void TaskBlink( void *pvParameters );
void TaskBlink2( void *pvParameters );
void TaskBlink3( void *pvParameters );
void TaskBlink4( void *pvParameters );
void TaskTadaa( void *pvParameters );

// the setup function runs once when you press reset or power the board
void setup() {
   // initialize serial communication at 9600 bits per second:
  mySerial.begin(9600);  

  // Now set up two tasks to run independently.
  xTaskCreate(
    TaskBlink
    ,  (const portCHAR *)"Blink"   // A name just for humans
    ,  128  // Stack size
    ,  NULL
    ,  2  // priority
    ,  NULL );
  xTaskCreate(TaskBlink2,(const portCHAR *)"Blink2",128, NULL,2,NULL );
  xTaskCreate(TaskBlink3,(const portCHAR *)"Blink3",128, NULL,2,NULL );
  xTaskCreate(TaskBlink4,(const portCHAR *)"Blink4",128, NULL,2,NULL );

  xTaskCreate(
    TaskTadaa
    ,  (const portCHAR *) "Tadaa"
    ,  128 // This stack size can be checked & adjusted by reading Highwater
    ,  NULL
    ,  1  // priority
    ,  NULL );

  // Now the task scheduler, which takes over control of scheduling individual tasks, is automatically started.
}

void loop()
{
  // Empty. Things are done in Tasks.
}

/*--------------------------------------------------*/
/*---------------------- Tasks ---------------------*/
/*--------------------------------------------------*/

void TaskBlink(void *pvParameters)  // This is a task.
{
  (void) pvParameters;

  // initialize digital pin 13 as an output.
  pinMode(13, OUTPUT);

  for (;;) // A Task shall never return or exit.
  {
    digitalWrite(13, HIGH);   // turn the LED on (HIGH is the voltage level)
    mySerial.println("LED 13 Nyala");
    vTaskDelay( 1000 / portTICK_PERIOD_MS ); // wait for one second
    digitalWrite(13, LOW);    // turn the LED off by making the voltage LOW
    mySerial.println("LED 13 Padam");
    vTaskDelay( 1000 / portTICK_PERIOD_MS ); // wait for one second
  }
}
void TaskBlink2(void *pvParameters){
  (void) pvParameters;
  pinMode(2, OUTPUT);
  for (;;) {
    digitalWrite(2, HIGH); vTaskDelay( 2000 / portTICK_PERIOD_MS );mySerial.println("LED 2 Nyala");
    digitalWrite(2, LOW);  vTaskDelay( 2000 / portTICK_PERIOD_MS );mySerial.println("LED 2 Padam"); 
  }
}

void TaskBlink3(void *pvParameters){
  (void) pvParameters;
  pinMode(3, OUTPUT);
  for (;;) {
    digitalWrite(3, HIGH); vTaskDelay( 500 / portTICK_PERIOD_MS );mySerial.println("LED 3 Nyala");
    digitalWrite(3, LOW);  vTaskDelay( 1500 / portTICK_PERIOD_MS );mySerial.println("LED 3 Padam"); 
  }
}

void TaskBlink4(void *pvParameters){
  (void) pvParameters;
  pinMode(4, OUTPUT);
  for (;;) {
    digitalWrite(4, HIGH); vTaskDelay( 500 / portTICK_PERIOD_MS );mySerial.println("LED 4 Nyala");
    digitalWrite(4, LOW);  vTaskDelay( 250 / portTICK_PERIOD_MS );mySerial.println("LED 4 Padam"); 
  }
}

void TaskTadaa(void *pvParameters)  // This is a task.
{
  (void) pvParameters;
  for (;;)
  {
    // read the input on analog pin 0:
    n++;
    if (n>100){n = 0;}
    // print out the value you read:
    mySerial.print("Tadaa...");
    mySerial.println(n);
    vTaskDelay(2000/portTICK_PERIOD_MS);// 2 second delay
    // one tick delay (15ms) in between reads for stability
  }
}

Monday, May 25, 2015

Android Studio on My OS X Yosemite


Well, a picture is worth thousand words.

So, here the millions words for you, :)


Previously I went to Android website to install Eclipse with ADT. I installed this Android Studio instead; on my Macbook Air wit OS X Yosemite. 

Oh yeah, you maybe encountered the error about JDK 7. I have to manually point to my JDK 7 installation.

Thursday, July 17, 2014

I Know I have to Use Android, but...

After my iPad "coudnt charge" problems and finally grab a Lenovo A3000 for Alfa. I notice several things.

Sure it have quad core processor and 2GB RAM. (my iPad 1st gen has single core and 256 RAM, my iPhone has dual core)

Sure it behave faster than my sister in law's sluggish galaxy tab 3.

Sure, it means I have to choose android over iOS with those specs advantage

but...


My quad core 2GB RAM android fells sluggish compared to my much smaller RAM iPad, even Alfa, my 2 years son, dissappointed by its unresponsiveness.

It have to be carried carefully too, something that Alfa, used to stepping and jumping and landing on sturdy aluminium iPad, didn't like.

On a completely unrelated subject, can my Android do text editing? Sure it can.

Spreadsheet? no problem.

Presentation? ugh, what do you mean? create slide? ok

Presentation on projector? I am not so sure. I used to use my iPad or iPhone to do presentation of my keynote (created on mac or on iDevice) on my physics class using VGA adapter. I don't know how to get an adapter for android here, universal or specifically for Lenovo A3000.

Creating latex document? I use Texpad on iPhone, not sure in Android.

Recording a multi track song? I used garageband on my iPad and iPhone, searching with no desirable result on Google Play.


Thursday, June 12, 2014

[Java Android] Array of Pseudo Random Integer on TextView (just for self documentation)

Here the code, the random numbers  generated at the creation and at "Start" button click

package com.nugnux.array;


import java.util.Random;

import android.app.Activity;
import android.os.Bundle;
import android.view.View;
import android.view.View.OnClickListener;
import android.widget.Button;
import android.widget.EditText;
import android.widget.TextView;
import android.widget.Toast;

public class MainActivity extends Activity{

private static String text = "heheh...";//for use as the tag when logging

/** Called when the activity is first created. */
@Override
public void onCreate(Bundle savedInstanceState) {
super.onCreate(savedInstanceState);
setContentView(R.layout.fragment_main);

proses();

Button buttonStart = (Button)findViewById(R.id.buttonStart);
buttonStart.setOnClickListener(startListener); // Register the onClick listener with the implementation above

Button buttonStop = (Button)findViewById(R.id.buttonStop);
buttonStop.setOnClickListener(stopListener); // Register the onClick listener with the implementation above

}

private void proses(){

TextView tulisan = (TextView)findViewById(R.id.tulisan);
tulisan.setText("tadaa...\n");
tulisan.append("this is array\n");

Random r = new Random();
int[]arr = new int[5];

for(int i=0;i&ltarr.length;i++)
{
arr[i] = Math.abs(r.nextInt()%255) +1;
tulisan.append(arr[i] + "\t\t");
}

}

//Create an anonymous implementation of OnClickListener
private OnClickListener startListener = new OnClickListener() {
public void onClick(View v) {
proses();
Toast.makeText(MainActivity.this, "The Start button was clicked.", Toast.LENGTH_LONG).show();
}
};
// Create an anonymous implementation of OnClickListener
private OnClickListener stopListener = new OnClickListener() {
public void onClick(View v) {
Toast.makeText(MainActivity.this, "The Stop button was clicked.", Toast.LENGTH_LONG).show();
TextView tulisan = (TextView)findViewById(R.id.tulisan);
tulisan.setText("tadaa...");
}
};
}

[Java Android] Create Circle and Line using Canvas on Eclipse with ADT (just for self documentation)

here it is,

I just create new Android app and go straigth to MainActivity.java without setting up the interface, so res/value/strings.xml  and res/layout/* is left as is

and my activity is mainly in MainActivity :)


package com.nugnux.gambar;

import android.app.Activity;
//import android.app.ActionBar;
import android.app.Fragment;
import android.content.Context;
import android.graphics.Canvas;
import android.graphics.Color;
import android.graphics.Paint;
import android.os.Bundle;
import android.os.Handler;
import android.view.LayoutInflater;
import android.view.Menu;
import android.view.MenuItem;
import android.view.View;
import android.view.ViewGroup;
//import android.os.Build;
import android.widget.Toast;

public class MainActivity extends Activity {

private String tulisan="";
private final int interval = 3000; // 1 Second
private Handler handler = new Handler();
private Runnable runnable = new Runnable(){
public void run() {
Toast.makeText(MainActivity.this, "Tadaa...", Toast.LENGTH_SHORT).show();
}
};
DrawView drawView;

@Override
protected void onCreate(Bundle savedInstanceState) {
super.onCreate(savedInstanceState);
tulisan = Long.toString(System.currentTimeMillis());
Toast.makeText(MainActivity.this, "Heheh..."+tulisan, Toast.LENGTH_SHORT).show();

drawView = new DrawView(this);
drawView.setBackgroundColor(Color.WHITE);
setContentView(drawView);

//handler.postAtTime(runnable, System.currentTimeMillis()+interval);
handler.postDelayed(runnable, interval);
//handler.postDelayed(r, delayMillis)

}
class DrawView extends View {
Paint paint = new Paint();

public DrawView(Context context) {
super(context);
paint.setColor(Color.BLUE);
}
@Override
public void onDraw(Canvas canvas) {
super.onDraw(canvas);
canvas.drawLine(10, 20, 30, 40, paint);
canvas.drawLine(20, 10, 50, 20, paint);
canvas.drawCircle(100, 100, 10, paint);
}
}

@Override
public boolean onCreateOptionsMenu(Menu menu) {

// Inflate the menu; this adds items to the action bar if it is present.
getMenuInflater().inflate(R.menu.main, menu);
return true;
}

@Override
public boolean onOptionsItemSelected(MenuItem item) {
// Handle action bar item clicks here. The action bar will
// automatically handle clicks on the Home/Up button, so long
// as you specify a parent activity in AndroidManifest.xml.
int id = item.getItemId();
if (id == R.id.action_settings) {
return true;
}
return super.onOptionsItemSelected(item);
}

/**
* A placeholder fragment containing a simple view.
*/
public static class PlaceholderFragment extends Fragment {

public PlaceholderFragment() {
}

@Override
public View onCreateView(LayoutInflater inflater, ViewGroup container,
Bundle savedInstanceState) {
View rootView = inflater.inflate(R.layout.fragment_main, container,
false);
return rootView;
}
}
}
 
...still figuring how to create moveTo lineTo since it'll come handy for drawing curve (sine, cosine, some exotic function) and animating it :)


Wednesday, June 11, 2014

The Impressions

So, after tinkering with Lenovo A3000 for 5 day...

The IPS screen is acceptable

The quadcore processor is doing what it supposed to do, fast enough

Getting used with android onscreen keyboard ( it's my 1st android device, i used iPhone and iPad), no AZERTY layout tough


The Playstore is fairly equal to AppStore. Keep in mind on android open source and open community nature, there's many apps that similar each other, and in some case, apps that has no purpose or simply didn't work.

The treasure (for me) is AIDE, an IDE app to create android app from inside android itself; something that's forbidden in iOS, :)

No home button is definitely problem for me, as it's replacement for my 2 years son's broken iPad. The challenge is how to teach him to use power button to waking up the device. The other solution is set the timeout display to 30 minutes and risk on fast drained battery.

Still give it a chance and time, .....

(My iPad is practically dead brick now, couldn't be charged, got the message like "couldn't charge with this accesories" or "this acessories not support charging" even with new original cable ; it's likely the connector is short circuited and blown away)

(edit: "Charging is not supported with this accessory")


Create Android Application (Thermometer Converter) on Android Itself, using AIDE

It my early android apps developed using Eclipse and ADT on my Mac and now ported to AIDE on my A3000, which is, say, just copy and paste, :).

The app itself consist of two button, one textview, one edit text and a spinner. The input in edit text is processed based on spinner value and the result is displayed on text edit. The button is just for checking and have fun, :)

That's it, now let's get our hand dirty...


Of course the first step is open AIDE apps, :)

 then scroll down until "For Expert" choice appear, I didn't bother to use tutorial, you may like it though, :)
 choose "Create new Project here", then choose "New App"

 Fill the form
 here my main.xml on res/layout
<?xml version="1.0" encoding="utf-8"?>
<LinearLayout
xmlns:android="http://schemas.android.com/apk/res/android"
android:orientation="vertical"
android:layout_width="fill_parent"
android:layout_height="fill_parent"
>
<TextView
android:id="@+id/tulisan"
android:layout_width="fill_parent"
android:layout_height="wrap_content"
android:padding="10dp"
android:text="This is a simple two button app. \r\n \r\n Tell your user what your app does here \r\n \r\n \r\n \r\n"
android:textColor="#005500" />

<EditText
android:id="@+id/editText1"
android:layout_width="wrap_content"
android:layout_height="wrap_content"
android:text="10"
android:ems="10" >
<requestFocus />
</EditText>
<Spinner
android:id="@+id/sprOperator"
android:layout_width="wrap_content"
android:layout_height="wrap_content"
android:entries="@array/sprSuhu"
/>

<Button
android:id="@+id/buttonStart"
android:layout_width="fill_parent"
android:layout_height="wrap_content"
android:text="Start"/>
<Button
android:id="@+id/buttonStop"
android:layout_width="fill_parent"
android:layout_height="wrap_content"
android:text="Stop"/>
</LinearLayout> 
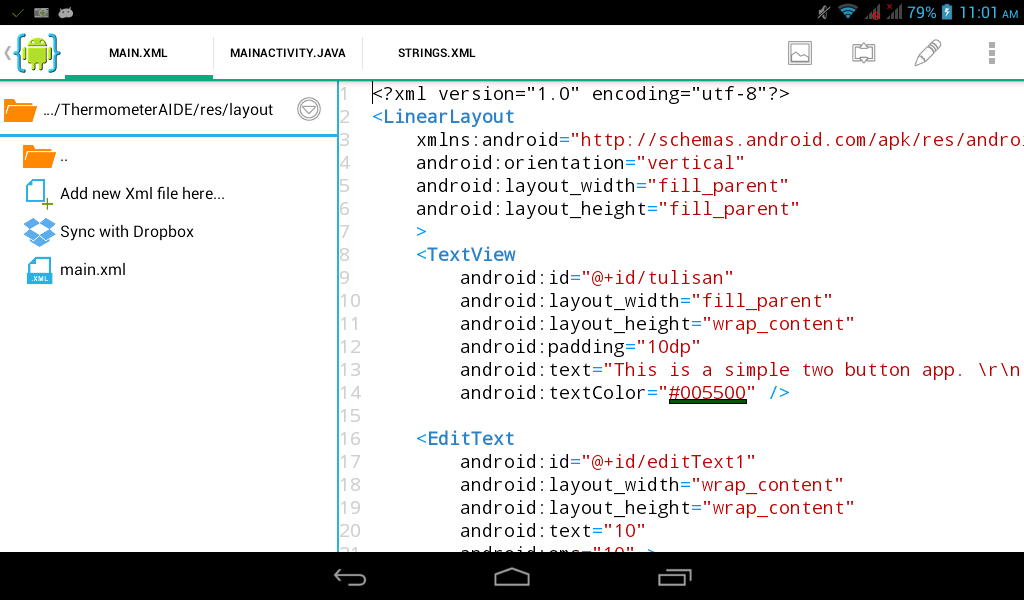


here my strings.xml on res/value
<?xml version="1.0" encoding="utf-8"?>
<resources>
<string name="app_name">ThermometerPram</string>
<string name="hello_world">Hello world!</string>
<string name="action_settings">Settings</string>
<string-array name="sprSuhu">
<item >C</item>
<item >F</item>
<item >R</item>
<item >K</item>
</string-array>
</resources>


 ..and my MainActivity.java on src/com/nugnux/thermoaide
package com.nugnux.thermoaide;

import android.app.*;
import android.os.*;
import android.view.*;
import android.widget.*;
import android.view.View.OnClickListener;

public class MainActivity extends Activity
{
private static String logtag = "TwoButtonApp";//for use as the tag when logging
private static String text = "belum di pilih";//for use as the tag when logging
private static int pilihan = 0;//for use as the tag when logging
/** Called when the activity is first created. */
@Override
public void onCreate(Bundle savedInstanceState)
{
super.onCreate(savedInstanceState);
setContentView(R.layout.main);
Spinner spinner = (Spinner) findViewById(R.id.sprOperator);
final String sprSuhu[] = getResources().getStringArray(R.array.sprSuhu);
ArrayAdapter adapter = ArrayAdapter.createFromResource(this,
R.array.sprSuhu, android.R.layout.simple_spinner_item);
spinner.setAdapter(adapter);

// Set the ClickListener for Spinner
spinner.setOnItemSelectedListener(new AdapterView.OnItemSelectedListener() {
public void onItemSelected(AdapterView adapterView, View view, int i, long l) {
// TODO Auto-generated method stub
Toast.makeText(MainActivity.this,"Anda memilih satuan "
+ sprSuhu[i]+" ",Toast.LENGTH_SHORT).show();
text=sprSuhu[i];
pilihan=i;
hitung();
}
// If no option selected
public void onNothingSelected(AdapterView arg0) {
// TODO Auto-generated method stub
}
});
}

//Create an anonymous implementation of OnClickListener
private OnClickListener startListener = new OnClickListener() {
public void onClick(View v) {
//Log.d(logtag,"onClick() called - start button");
Toast.makeText(MainActivity.this, "The Start button was clicked.", Toast.LENGTH_LONG).show();
TextView tulisan = (TextView)findViewById(R.id.tulisan);
hitung();
//Log.d(logtag,"onClick() ended - start button");
}
};

// Create an anonymous implementation of OnClickListener
private OnClickListener stopListener = new OnClickListener() {
public void onClick(View v) {
//Log.d(logtag,"onClick() called - stop button");
Toast.makeText(MainActivity.this, "The Stop button was clicked.", Toast.LENGTH_LONG).show();
TextView tulisan = (TextView)findViewById(R.id.tulisan);
tulisan.setText("tadaa...");
//Log.d(logtag,"onClick() ended - stop button");
}
};
public void hitung(){
double hasil,suhu;
EditText editText1 =(EditText)findViewById(R.id.editText1);
TextView tulisan = (TextView)findViewById(R.id.tulisan);
tulisan.setText("hehehe, akhirnya...");
try {
hasil=Double.parseDouble(editText1.getText().toString());
tulisan.append(" \r\n(angka di bawah ini adalah "+Double.toString(hasil)+" )");
//hasil=Math.pow(hasil, 2);
tulisan.append(" \r\n[pangkatnya adalah "+Double.toString(Math.pow(hasil, 2))+" ] \r\nspinner bernilai "+text);
if (pilihan==0){
suhu=9./5.*hasil+32;
tulisan.append("\r\n Suhu "+Double.toString(hasil)+" C jika dikonversi akan menjadi bernilai:");
tulisan.append("\r\n"+Double.toString(suhu)+" F");
suhu=4./5.*hasil;
tulisan.append("\r\n"+Double.toString(suhu)+" R");
suhu=hasil+273;
tulisan.append("\r\n"+Double.toString(suhu)+" K");
}
if (pilihan==1){
suhu=5./9.*(hasil-32);
tulisan.append("\r\n Suhu "+Double.toString(hasil)+" F jika dikonversi akan menjadi bernilai:");
tulisan.append("\r\n"+Double.toString(suhu)+" C");
suhu=4./9.*(hasil-32);
tulisan.append("\r\n"+Double.toString(suhu)+" R");
suhu=(hasil-32)*5./9.+273;
tulisan.append("\r\n"+Double.toString(suhu)+" K");
}
if (pilihan==2){
suhu=9./4.*hasil+32;
tulisan.append("\r\n Suhu "+Double.toString(hasil)+" R jika dikonversi akan menjadi bernilai:");
tulisan.append("\r\n"+Double.toString(suhu)+" F");
suhu=5./4.*hasil;
tulisan.append("\r\n"+Double.toString(suhu)+" C");
suhu=hasil*5./4.+273;
tulisan.append("\r\n"+Double.toString(suhu)+" K");
}
if (pilihan==3){
suhu=9./5.*(hasil-273)+32;
tulisan.append("\r\n Suhu "+Double.toString(hasil)+" K jika dikonversi akan menjadi bernilai:");
tulisan.append("\r\n"+Double.toString(suhu)+" F");
suhu=4./5.*(hasil-273);
tulisan.append("\r\n"+Double.toString(suhu)+" R");
suhu=hasil-273;
tulisan.append("\r\n"+Double.toString(suhu)+" C");
}
} catch (NumberFormatException e) {
tulisan.setText(e.getMessage()+", masukkan angka");
}
}

}
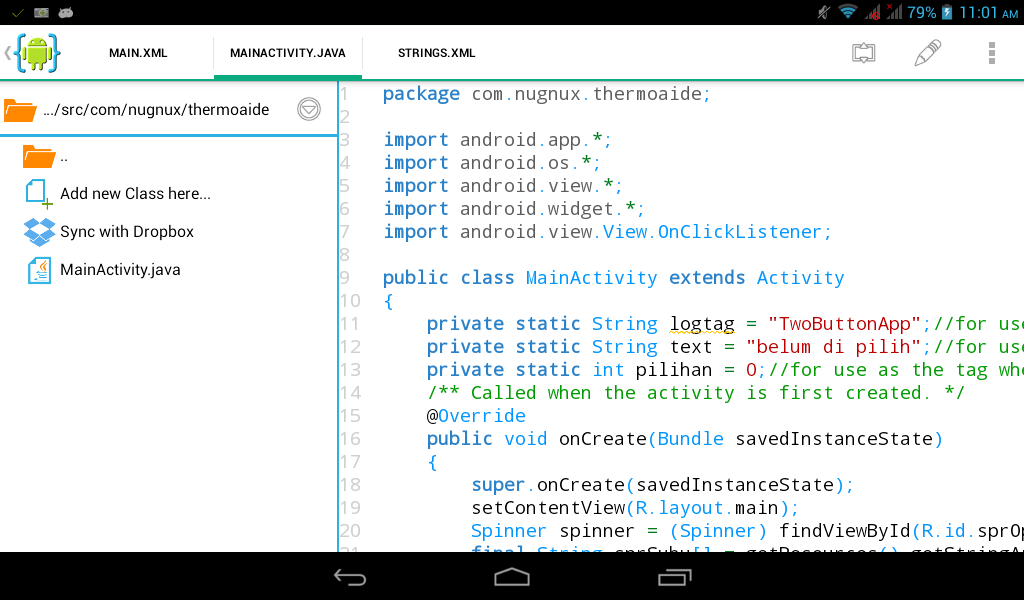


run it
 

it will build


 and prompt us whether we want to install the built app, of course...


 here the result


Tuesday, June 10, 2014

Another AIDE ScreenShot on My Lenovo A3000

Here it is,
The screenshot of my Thermometer android app, using textview, edit text,spinner and button

AIDE on My Lenovo A3000

Here some screenshot of my AIDE


323f (5) amp (1) android (12) apple (7) arduino (18) art (1) assembler (21) astina (4) ATTiny (23) blackberry (4) camera (3) canon (2) cerita (2) computer (106) crazyness (11) debian (1) delphi (39) diary (286) flash (8) fortran (6) freebsd (6) google apps script (8) guitar (2) HTML5 (10) IFTTT (7) Instagram (7) internet (12) iOS (5) iPad (6) iPhone (5) java (1) javascript (1) keynote (2) LaTeX (6) lazarus (1) linux (29) lion (15) mac (28) macbook air (8) macbook pro (3) macOS (1) Math (3) mathematica (1) maverick (6) mazda (4) microcontroler (35) mountain lion (2) music (37) netbook (1) nugnux (6) os x (36) php (1) Physicist (29) Picture (3) programming (189) Python (109) S2 (13) software (7) Soliloquy (125) Ubuntu (5) unix (4) Video (8) wayang (3) yosemite (3)