Here the code, or, for me, a template to create animation.
Manipulate[and here the result
Graphics[{
Blue,
Circle[{t, 0}, 1]
},
PlotRange -> {{-10, 10}, {10, -10}},
ImageSize -> {400, 300},
Background -> GrayLevel[0.9],
Axes -> True
],
{t, 0, 5}
]

Manipulate[and here the result
Graphics[{
Blue,
Circle[{t, 0}, 1]
},
PlotRange -> {{-10, 10}, {10, -10}},
ImageSize -> {400, 300},
Background -> GrayLevel[0.9],
Axes -> True
],
{t, 0, 5}
]

unit Unit1;
interface
uses
Windows, Messages, SysUtils, Variants, Classes, Graphics, Controls, Forms,
Dialogs, StdCtrls, ExtCtrls;
type
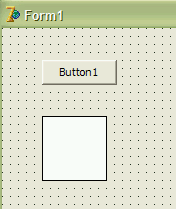
TForm1 = class(TForm)
Shape1: TShape;
Button1: TButton;
procedure FormCreate(Sender: TObject);
procedure Button1Click(Sender: TObject);
private
{ Private declarations }
public
{ Public declarations }
end;
type
tkotak=record
x,y,vx,vy,ax,ay:real;
end;
var
Form1: TForm1;
jalan:boolean;
kotak:tkotak;
dt:real;
implementation
{$R *.dfm}
procedure proses;
begin
kotak.vx:=kotak.vx+kotak.ax*dt;
kotak.x:=kotak.x+kotak.vx*dt;
form1.Shape1.Left:=round(kotak.x);
end;
procedure TForm1.FormCreate(Sender: TObject);
begin
button1.Caption:='jalan';
jalan:=false;
kotak.x:=0;
kotak.y:=0;
kotak.vx:=5;
kotak.vy:=0;
kotak.ax:=10;
kotak.ay:=0;
dt:=0.1;
shape1.Left:=round(kotak.x);
end;
procedure TForm1.Button1Click(Sender: TObject);
begin
jalan:=not(jalan);
if jalan=true then button1.Caption:='stop' else button1.Caption:='jalan';
while jalan=true do begin
proses;
application.ProcessMessages;
sleep(100);
end;
end;
end.
unit Unit1;

interface

uses
  Windows, Messages, SysUtils, Variants, Classes, Graphics, Controls, Forms,
  Dialogs, StdCtrls;

type
  TForm1 = class(TForm)
    Button1: TButton;
    procedure Button1Click(Sender: TObject);
    procedure FormCreate(Sender: TObject);
  private
    { Private declarations }
  public
    { Public declarations }
  end;

var
  Form1: TForm1;
  jalan:boolean;

implementation

{$R *.dfm}

procedure TForm1.Button1Click(Sender: TObject);
begin
  jalan:=not(jalan);
  if jalan=true then button1.Caption:='stop' else button1.Caption:='jalan';
end;

procedure TForm1.FormCreate(Sender: TObject);
begin
  jalan:=false;
end;

end.


unit Unit1;

interface

uses
  Windows, Messages, SysUtils, Variants, Classes, Graphics, Controls, Forms,
  Dialogs, ExtCtrls, StdCtrls;

type
  TForm1 = class(TForm)
    Edit1: TEdit;
    Edit2: TEdit;
    Button1: TButton;
    Label1: TLabel;
    Label2: TLabel;
    Shape1: TShape;
    procedure FormCreate(Sender: TObject);
    procedure Button1Click(Sender: TObject);
  private
    { Private declarations }
  public
    { Public declarations }
  end;

var
  Form1: TForm1;
  jalan:boolean;
  ax,vx,xx,dt:real;
implementation

{$R *.dfm}

procedure proses;
begin
  xx:=xx+vx*dt;
  vx:=vx+ax*dt;
  with form1 do begin
    edit2.Text:=floattostr(vx);
    shape1.Left:=round(xx);
  end;
end;

procedure TForm1.FormCreate(Sender: TObject);
begin
  jalan:=false;
  edit1.Text:='0';
  edit2.Text:='1';
  dt:=0.1;
  button1.Caption:='jalan';
end;

procedure TForm1.Button1Click(Sender: TObject);
begin
  jalan:=not(jalan);
  ax:=strtofloat(edit1.Text);
  vx:=strtofloat(edit2.Text);
  xx:=shape1.left;
  if jalan=true then button1.Caption:='stop' else button1.Caption:='jalan';
  while jalan=true do begin
    proses;
    application.ProcessMessages;
    sleep(100);
  end;
end;

end.
stringgrid1.Cells[0,0]:='No';Jalankan program. Kini stringgrid1 memiliki judul pada baris pertama tiap kolom.
stringgrid1.Cells[1,0]:='Nama';
stringgrid1.Cells[2,0]:='U1';
stringgrid1.Cells[3,0]:='U2';
stringgrid1.Cells[4,0]:='U3';
stringgrid1.Cells[5,0]:='U4';
stringgrid1.Cells[6,0]:='Nil';
stringgrid1.Cells[1,n]:=edit1.Text;Jalankan program. Ketikkan sebarang nama di edit1, kemudian klik tombol input, lakukan berulang-ulang.
stringgrid1.Cells[0,n]:=inttostr(n);
n:=n+1;


ssh -ND 7777 yourusername@shellserver.com
aravir@aravir-VirtualBox:~$ sudo vi /etc/fstab

# /etc/fstab: static file system information.
#
# Use 'blkid' to print the universally unique identifier for a
# device; this may be used with UUID= as a more robust way to name devices
# that works even if disks are added and removed. See fstab(5).
#
#
proc            /proc           proc    nodev,noexec,nosuid 0       0
# / was on /dev/sda1 during installation
UUID=3c8759e3-314b-4e42-a39e-efe9c18a130c /               ext4    errors=remount-ro 0       1
# swap was on /dev/sda5 during installation
UUID=1b64eb34-42af-4ada-8bf1-0273d572cdb6 none            swap    sw              0       0
#virtualbox shared folder
vbox    /home/aravir/vbox       vboxsf  auto    0       0
aravir@aravir-VirtualBox:~$ mountIt's like the vbox is successfully mounted TWO times, however:
/dev/sda1 on / type ext4 (rw,errors=remount-ro,commit=0)
proc on /proc type proc (rw,noexec,nosuid,nodev)
sysfs on /sys type sysfs (rw,noexec,nosuid,nodev)
fusectl on /sys/fs/fuse/connections type fusectl (rw)
none on /sys/kernel/debug type debugfs (rw)
none on /sys/kernel/security type securityfs (rw)
udev on /dev type devtmpfs (rw,mode=0755)
devpts on /dev/pts type devpts (rw,noexec,nosuid,gid=5,mode=0620)
tmpfs on /run type tmpfs (rw,noexec,nosuid,size=10%,mode=0755)
none on /run/lock type tmpfs (rw,noexec,nosuid,nodev,size=5242880)
none on /run/shm type tmpfs (rw,nosuid,nodev)
vbox on /home/aravir/vbox type vboxsf (rw)
binfmt_misc on /proc/sys/fs/binfmt_misc type binfmt_misc (rw,noexec,nosuid,nodev)
vbox on /media/sf_vbox type vboxsf (rw,gid=1001)
gvfs-fuse-daemon on /home/aravir/.gvfs type fuse.gvfs-fuse-daemon (rw,nosuid,nodev,user=aravir)
aravir@aravir-VirtualBox:~$
aravir@aravir-VirtualBox:~$ sudo vi /etc/rc.local
#!/bin/sh -eRestart the machine and voila, its success
#
# rc.local
#
# This script is executed at the end of each multiuser runlevel.
# Make sure that the script will "exit 0" on success or any other
# value on error.
#
# In order to enable or disable this script just change the execution
# bits.
#
# By default this script does nothing.
mount -t vboxsf vbox /home/aravir/vbox
exit 0
 |
| From python |
x=raw_input('type anything \n')
print 'you typed ', x
Nugrohos-MacBook-Pro:python nugroho$ python input.py
type anything
a
you typed  a
Nugrohos-MacBook-Pro:python nugroho$ python input.py
type anything
12
you typed  12
Nugrohos-MacBook-Pro:python nugroho$ python input.py
type anything
sin(x)+x**2
you typed  sin(x)+x**2
Nugrohos-MacBook-Pro:python nugroho$
c='sin(x)+x**2'
me='Hello folks, Aravir here'
x=input('type anything \n')
print 'you typed ', x
Nugrohos-MacBook-Pro:python nugroho$ python input.py
type anything
a
Traceback (most recent call last):
  File "input.py", line 3, in
    x=input('type anything \n')
  File "", line 1, in
NameError: name 'a' is not defined
Nugrohos-MacBook-Pro:python nugroho$ python input.py
type anything
12
you typed  12
Nugrohos-MacBook-Pro:python nugroho$ python input.py
type anything
sin(x)+x**2
Traceback (most recent call last):
  File "input.py", line 3, in
    x=input('type anything \n')
  File "", line 1, in
NameError: name 'sin' is not defined
Nugrohos-MacBook-Pro:python nugroho$ python input.py
type anything
c
you typed  sin(x)+x**2
Nugrohos-MacBook-Pro:python nugroho$ python input.py
type anything
me
you typed  Hello folks, Aravir here
Nugrohos-MacBook-Pro:python nugroho$
from BaseHTTPServer import BaseHTTPRequestHandler, HTTPServer
import sys,parser
from math import *
import numpy as np
class Handler(BaseHTTPRequestHandler):
def do_GET(self):
n=10
x1=-7
x2=7
y = 'sin(x)+x**2'
z = parser.expr(y).compile()
self.send_response(200)
self.send_header("Content-type", "text/html")
self.end_headers()
self.wfile.write("Hi Folks, Aravir here ")
self.wfile.write("")
self.wfile.write("Hi Folks, Aravir here
")
self.wfile.write("
")
for i in (range(x1,x2)):
x=i
self.wfile.write("The value of ")
self.wfile.write(y )
self.wfile.write(" on x = " )
self.wfile.write(x)
self.wfile.write(" is " )
self.wfile.write(eval(z) )
self.wfile.write("
")
self.wfile.write("")
if __name__=="__main__":
try:
server = HTTPServer(("", 8080), Handler)
server.serve_forever()
except KeyboardInterrupt:
server.socket.close()
 |
| From python |
from BaseHTTPServer import BaseHTTPRequestHandler, HTTPServerAccess it using web browser in localhost:8080 from your computer running code above, or
import sys,parser
from math import *
import numpy as np
class Handler(BaseHTTPRequestHandler):
def do_GET(self):
n=10
x=7
y = 'sin(x)+x**2'
z = parser.expr(y).compile()
self.send_response(200)
self.send_header("Content-type", "text/html")
self.end_headers()
self.wfile.write("Hi Folks, Aravir here ")
self.wfile.write("")
self.wfile.write("Hi Folks, Aravir here
")
self.wfile.write("
")
self.wfile.write("The value of ")
self.wfile.write(y )
self.wfile.write(" on x = " )
self.wfile.write(x)
self.wfile.write(" is " )
self.wfile.write(eval(z) )
self.wfile.write("")
if __name__=="__main__":
try:
server = HTTPServer(("", 8080), Handler)
server.serve_forever()
except KeyboardInterrupt:
server.socket.close()
 |
| From python |
from BaseHTTPServer import BaseHTTPRequestHandler, HTTPServer

class Handler(BaseHTTPRequestHandler):
    def do_GET(self):
        self.send_response(200)
        self.send_header("Content-type", "text/html")
        self.end_headers()

        self.wfile.write("magic content goes here")

if __name__=="__main__":
    try:
        server = HTTPServer(("", 8080), Handler)
        server.serve_forever()
    except KeyboardInterrupt:
        server.socket.close()
 |
| From python |
from BaseHTTPServer import BaseHTTPRequestHandler, HTTPServerObserve the self.wfile.write line. Whatever you write there ends up in the browser. If it matters, you can use self.path in the Handler to check which file was requested.
class Handler(BaseHTTPRequestHandler):
def do_GET(self):
self.send_response(200)
self.send_header("Content-type", "text/html")
self.end_headers()
self.wfile.write("magic content goes here")
if __name__=="__main__":
try:
server = HTTPServer(("", 8080), Handler)
server.serve_forever()
except KeyboardInterrupt:
server.socket.close()
$ cd
$ python -m SimpleHTTPServer
Serving HTTP on 0.0.0.0 port 8000 ...Now open a browser and type the computer address like:
http://192.168.1.1:8000
http://127.0.0.1:8000
$ python -m SimpleHTTPServer 8080
If you want to only serve on localhost you'll need to write a custom Python program such as:import sys
import BaseHTTPServer
from SimpleHTTPServer import SimpleHTTPRequestHandler
HandlerClass = SimpleHTTPRequestHandler
ServerClass = BaseHTTPServer.HTTPServer
Protocol = "HTTP/1.0"
if sys.argv[1:]:
port = int(sys.argv[1])
else:
port = 8000
server_address = ('127.0.0.1', port)
HandlerClass.protocol_version = Protocol
httpd = ServerClass(server_address, HandlerClass)
sa = httpd.socket.getsockname()
print "Serving HTTP on", sa[0], "port", sa[1], "..."
httpd.serve_forever()
 |
| From php |
My sky is high, blue, bright and silent.

Nugroho's (almost like junk) blog
By: Nugroho Adi Pramono