Nugroho's blog.: computer
Showing posts with label computer. Show all posts

Saturday, December 17, 2011

Robert Cross Edge Detection using Python on OS X Lion

The code below will convert an image to grayscale, get its pixel value and save it in array. With its pixel value in array, it's easy to apply Robert Cross Edge detect operation.

This operator is simpler than Sobel's.


print 'Program Python Deteksi Tepi'
print 'oleh Nugroho Adi Pramono'
'''Komentar diantara tiga-tanda petik tidak akan dibaca
oleh python'''
#komentar setelah tanda pagar juga tidak di baca oleh python
import Image #memanggil modul untuk olah gambar
import os,sys #memanggil modul untuk mengakses file
import numpy as np #memanggil modul untuk operasi maatematika matrik/array
gb = Image.open('../gambar.jpg') #memasukkan gambar ke variabel gb
print 'format awal: ' ,gb.format, "%dx%d" % gb.size, gb.mode
print 'konversi ke grayscale'
gbw = gb.convert("L")
gbw.save('gambarBW.jpg') #simpan hasil konversi ddg nama gambarBW.jpg
gbw = Image.open('gambarBW.jpg') #masukkan gambar grayscale hasil konversi ke variabel gbw
print 'format: ',gbw.format, "%dx%d" % gbw.size, gbw.mode
ukuran=gbw.size #mengambil nilai resolusi gambar
'''buat array r dan s berukuran sama dengan ukuran gambar'''
r=np.zeros((ukuran[0],ukuran[1]),dtype=np.integer)
s=np.zeros((ukuran[0],ukuran[1]),dtype=np.integer)
print 'Mengambil nilai piksel, masukkan ke array r'
for i in range (ukuran[0]):
for j in range (ukuran[1]):
r[i,j]=gbw.getpixel((i,j))
print 'Deteksi tepi menggunakan operator Robert'
gx=np.zeros((ukuran[0],ukuran[1]),dtype=np.integer)
gy=np.zeros((ukuran[0],ukuran[1]),dtype=np.integer)
g=np.zeros((ukuran[0],ukuran[1]),dtype=np.float)
for i in range (ukuran[0]-1):
for j in range (ukuran[1]-1):
gx[i,j]=r[i,j]-r[i+1,j+1]
gy[i,j]=r[i,j+1]-r[i+1,j]
g=np.sqrt(np.power(gx,2)+np.power(gy,2))
print 'Atur threshold'
for i in range (ukuran[0]-1):
for j in range (ukuran[1]-1):
if (g[i,j]<11):
s[i,j]=0
else:
s[i,j]=255

print 'update gambar'
for i in range (ukuran[0]):
for j in range (ukuran[1]):
gbw.putpixel((i,j),s[i,j]) #letakkan pixel yang telah dimodifikasi ke posisi i,j
print 'Menyimpan gambar'
gbw.save('gambarRobert.jpg') #simpan dengan nama gambarRobert.jpg
print 'Gambar tersimpan'
print 'Program Selesai'

Here, the result

Image source
From python

Gray-scaled image
From python

Edge-detected image
From python

Vertical Sobel Operator Manual Edge Detection using Python and PIL

This python code is used to detect the edge, of course, using Sobel Operator. The 'manual' word in this post title means I apply it manually as scipy python module has it capability. This code convert a jpeg image to grayscale and then detect its edge.


Here the code, I used vertical detection only as my horizontal code result is scrambling. I will update it as soon as all code success

print 'Program Python Deteksi Tepi'
print 'oleh Nugroho Adi Pramono'
'''Komentar diantara tiga-tanda petik tidak akan dibaca
oleh python'''
#komentar setelah tanda pagar juga tidak di baca oleh python
import Image #memanggil modul untuk olah gambar
import os,sys #memanggil modul untuk mengakses file
import numpy as np #memanggil modul untuk operasi maatematika matrik/array
gb = Image.open('../gambar.jpg') #memasukkan gambar ke variabel gb
print 'format awal: ' ,gb.format, "%dx%d" % gb.size, gb.mode
print 'konversi ke grayscale'
gbw = gb.convert("L")
gbw.save('gambarBW.jpg') #simpan hasil konversi ddg nama gambarBW.jpg
gbw = Image.open('gambarBW.jpg') #masukkan gambar grayscale hasil konversi ke variabel gbw
print 'format: ',gbw.format, "%dx%d" % gbw.size, gbw.mode
ukuran=gbw.size #mengambil nilai resolusi gambar
'''buat array r dan s berukuran sama dengan ukuran gambar'''
r=np.zeros((ukuran[0],ukuran[1]),dtype=np.integer)
s=np.zeros((ukuran[0],ukuran[1]),dtype=np.integer)
print 'Mengambil nilai piksel, masukkan ke array r'
for i in range (ukuran[0]):
for j in range (ukuran[1]):
r[i,j]=gbw.getpixel((i,j))
print 'Deteksi tepi menggunakan operator Sobel'
gx=np.zeros((ukuran[0],ukuran[1]),dtype=np.integer)
gy=np.zeros((ukuran[0],ukuran[1]),dtype=np.integer)
g=np.zeros((ukuran[0],ukuran[1]),dtype=np.float)
for i in range (1,ukuran[0]-1):
for j in range (1,ukuran[1]-1):
gy[i,j]=r[i+1,j-1]+2*r[i+1,j]+r[i+1,j+1]-r[i-1,j-1]-2*r[i-1,j]-r[i-1,j+1]
print 'Atur threshold'
print 'update gambar Vertikal'
for i in range (ukuran[0]):
for j in range (ukuran[1]):
gbw.putpixel((i,j),np.abs(gy[i,j])) #letakkan pixel yang telah dimodifikasi ke posisi i,j
print 'Menyimpan gambar Vertikal'
gbw.save('gambarSobelVertikal.jpg') #simpan dengan nama gambarSobelVertikal.jpg
print 'Gambar tersimpan'
print 'Program Selesai'
And here the result

Image source
From python

Gray-scaled image
From python

Edge-detected image
From python


JPEG Support for Python 2.7's PIL Module on OS X Lion

My PIL module refuse to process jpeg image. It says that there is no decoder jpeg on my system. It's no good  since I want to process that kind of file using PIL in future, and my older iPhoto picture on my 13 inch MacBook Pro is generally in jpeg format too.

Here the snapshot


Nugrohos-MacBook-Pro:olah gambar nugroho$ python olahgambar.py 
Program Image Enchancement
Oleh Nugroho Adi Pramono
275514
===========================
format awal: JPEG 2448x3264 RGB
konversi ke grayscale
Traceback (most recent call last):
File "olahgambar.py", line 14, in
gbw = gb.convert("L")
File "/Library/Frameworks/Python.framework/Versions/2.7/lib/python2.7/site-packages/PIL/Image.py", line 679, in convert
self.load()
File "/Library/Frameworks/Python.framework/Versions/2.7/lib/python2.7/site-packages/PIL/ImageFile.py", line 189, in load
d = Image._getdecoder(self.mode, d, a, self.decoderconfig)
File "/Library/Frameworks/Python.framework/Versions/2.7/lib/python2.7/site-packages/PIL/Image.py", line 385, in _getdecoder
raise IOError("decoder %s not available" % decoder_name)
IOError: decoder jpeg not available
Nugrohos-MacBook-Pro:olah gambar nugroho$

So I googling for it and found libjpeg at http://www.ijg.org/files/, download, exctract and install it using magic UNIX words ./configure, make, make install

Nugrohos-MacBook-Pro:~ nugroho$ cd Downloads/jpeg-8c/
Nugrohos-MacBook-Pro:jpeg-8c nugroho$ ./configure
Nugrohos-MacBook-Pro:jpeg-8c nugroho$ make
Nugrohos-MacBook-Pro:jpeg-8c nugroho$ make test
rm -f testout*
./djpeg -dct int -ppm -outfile testout.ppm ./testorig.jpg
./djpeg -dct int -bmp -colors 256 -outfile testout.bmp ./testorig.jpg
./cjpeg -dct int -outfile testout.jpg ./testimg.ppm
./djpeg -dct int -ppm -outfile testoutp.ppm ./testprog.jpg
./cjpeg -dct int -progressive -opt -outfile testoutp.jpg ./testimg.ppm
./jpegtran -outfile testoutt.jpg ./testprog.jpg
cmp ./testimg.ppm testout.ppm
cmp ./testimg.bmp testout.bmp
cmp ./testimg.jpg testout.jpg
cmp ./testimg.ppm testoutp.ppm
cmp ./testimgp.jpg testoutp.jpg
cmp ./testorig.jpg testoutt.jpg
Nugrohos-MacBook-Pro:jpeg-8c nugroho$ sudo make install

reinstall PIL

PIL 1.1.7 SETUP SUMMARY
--------------------------------------------------------------------
version 1.1.7
platform darwin 2.7.2 (v2.7.2:8527427914a2, Jun 11 2011, 15:22:34)
[GCC 4.2.1 (Apple Inc. build 5666) (dot 3)]
--------------------------------------------------------------------
--- TKINTER support available
--- JPEG support available
--- ZLIB (PNG/ZIP) support available
*** FREETYPE2 support not available
*** LITTLECMS support not available
--------------------------------------------------------------------
To add a missing option, make sure you have the required
library, and set the corresponding ROOT variable in the
setup.py script.

Friday, December 16, 2011

Ubuntu 11.10 Oneiric Ocelot On OS X Lion's VBox (NAT and Host-Guest Sharing Folder)

After installing Ubuntu 11.10 on Mac OS X Lion using VirtualBox, here first impression of Oneiric Ocelot


There is dock at left, like on Mac.

Network is works flawlessy, I can surf internet using firefox, its NAT configuration come by default while installing it.
From Oneiric Ocelot

Firefox run at fullscreen(I mean ubuntu screen), just like Lion's or iPad's Safari (Lion's version of firefox didn't auto fullscreen yet). We can windowed-mode-ed it by hovering mouse at top edge of screen, it'll show menu-bar too

Hover mouse at top
From Oneiric Ocelot
It's windowed firefox

From Oneiric Ocelot
 If we click dash home, we'll got launchpad like (just like iPad or Lion's launchpad). At second tab, there's apps available to download.

From Oneiric Ocelot

 To access shared folder on Lion named vbox, I opened terminal by clicking Dash home and type terminal on search box
From Oneiric Ocelot

 First create directory
aravir@aravir-VirtualBox:~$mkdir vbox

mount shared vbox on lion using this command
aravir@aravir-VirtualBox:~$sudo mount -t vboxsf vbox vbox 

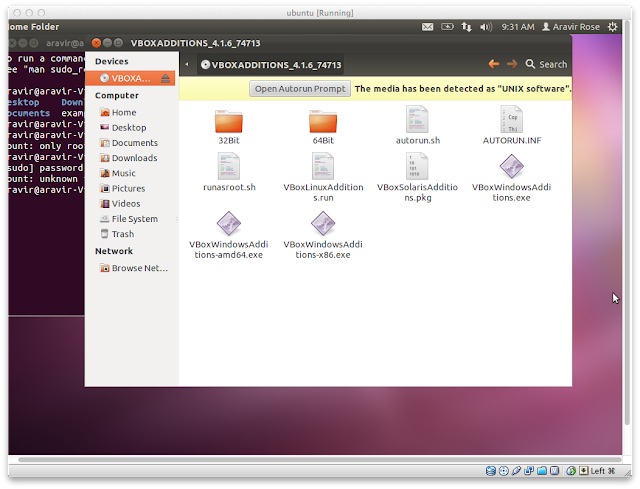
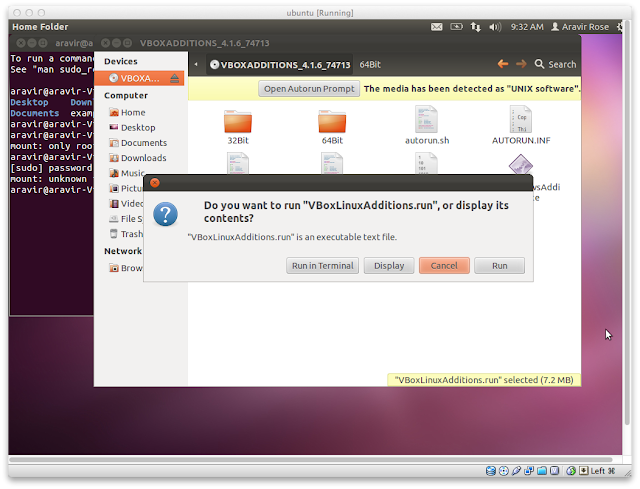
at screenshot you know it generate error because ubuntu did'nt recognize vboxsf filesystem. To introduce it, guest addition must be installed.
From Oneiric Ocelot
From Oneiric Ocelot
From Oneiric Ocelot
From Oneiric Ocelot
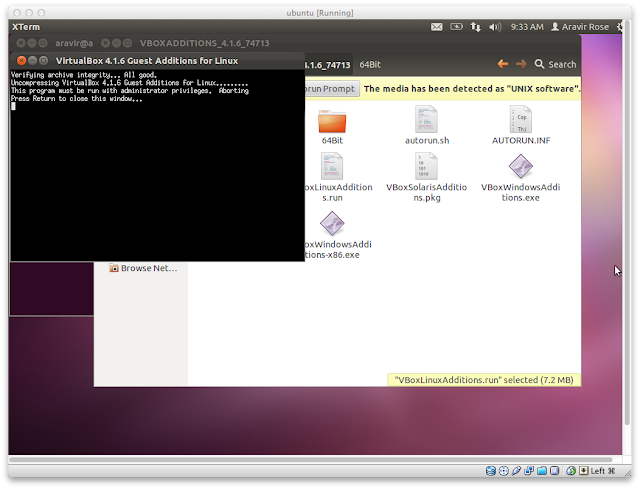
Failed. Guest addition need root privilege.
aravir@aravir-VirtualBox:~$cd /Media/VBOXADDITIONS_4.1.6_74713
$sudo ./VBoxLinuxAdditions.run

After guest addition installed and the system restarted (it's support full screen on my Macbook monitor now), retype the command above, and done

 Vbox directory before mounted
From Oneiric Ocelot
After mounted
From Oneiric Ocelot

Thursday, December 15, 2011

Installing Python-2.7's Imaging Library Module on OS X Lion

PIL, as its name suggest, is an imaging library for python. I used PIL to get every pixel of an image as 2x2 array information. With that I could modify it with many possibilities; edge detection, black and white transformation, log transformation, creating watermark, etc.

{update: I install this PIL module on my OS X El Capitan too, :), and easier


Installing PIL is an easy task, if we have its prerequities installed. Just download it and extract it and then install using this command

Nugrohos-MacBook-Pro:Imaging-1.1.7 nugroho$ python setup.py install
running install
running build
running build_py
creating build
creating build/lib.macosx-10.6-intel-2.7
...
unable to execute gcc-4.2: No such file or directory
error: command 'gcc-4.2' failed with exit status 1
Nugrohos-MacBook-Pro:Imaging-1.1.7 nugroho$
Oops, it is failed to install, it tell me that there is no gcc-4.2 on my machine, and that's true. I've modified my /usr/bin/gcc to point /usr/local/bin/gcc.

I have gcc 4.2 from Xcode4.2, which actually llvm-gcc. My existing gcc is gcc-4.6.2 so I cheated… I created symlink named gcc-4.2 on /usr/bin pointing /usr/local/bin/gcc

Nugrohos-MacBook-Pro:Imaging-1.1.7 nugroho$ ln -s /usr/local/bin/gcc /usr/bin/gcc-4.2
ln: /usr/bin/gcc-4.2: Permission denied
Nugrohos-MacBook-Pro:Imaging-1.1.7 nugroho$ sudo ln -s /usr/local/bin/gcc /usr/bin/gcc-4.2
Nugrohos-MacBook-Pro:Imaging-1.1.7 nugroho$

Still error, :(

gcc-4.2: error: x86_64: No such file or directory
gcc-4.2: error: unrecognized option ‘-arch’
error: command 'gcc-4.2' failed with exit status 1

Hm, maybe if I'm linking /usr/bin/gcc-4.2 to /usr/bin/llvm-gcc-4-2; it's gcc-4.2 after all, if we ignore llvm (don't know what is it stand for). It doesn't hurt if I'm trying, so..
Nugrohos-MacBook-Pro:Imaging-1.1.7 nugroho$ sudo rm /usr/bin/gcc-4.2 
Password:
Nugrohos-MacBook-Pro:Imaging-1.1.7 nugroho$ sudo ln -s /usr/bin/llvm-gcc-4.2 /usr/bin/gcc-4.2
Nugrohos-MacBook-Pro:Imaging-1.1.7 nugroho$ python setup.py install
running install
running build
running build_py
running build_ext
-
--------------------------------------------------------------------
PIL 1.1.7 SETUP SUMMARY
--------------------------------------------------------------------
version 1.1.7
platform darwin 2.7.2 (v2.7.2:8527427914a2, Jun 11 2011, 15:22:34)
[GCC 4.2.1 (Apple Inc. build 5666) (dot 3)]
--------------------------------------------------------------------
--- TKINTER support available
*** JPEG support not available
--- ZLIB (PNG/ZIP) support available
*** FREETYPE2 support not available
*** LITTLECMS support not available
--------------------------------------------------------------------
creating /Library/Frameworks/Python.framework/Versions/2.7/lib/python2.7/site-packages/PIL.pth
Nugrohos-MacBook-Pro:Imaging-1.1.7 nugroho$

Wow, success 

Well, no need gcc4.6.2 afterall, just create symbolic link of llvm-gcc-4.2 named gcc-4.2,:)

test

Nugrohos-MacBook-Pro:Imaging-1.1.7 nugroho$ python
Python 2.7.2 (v2.7.2:8527427914a2, Jun 11 2011, 15:22:34)
[GCC 4.2.1 (Apple Inc. build 5666) (dot 3)] on darwin
Type "help", "copyright", "credits" or "license" for more information.
>>> import image
Traceback (most recent call last):
File "", line 1, in
ImportError: No module named image
>>> import Image
>>>

OK

Install GCC 4.6.2 on OS X Lion (success)

Still failed, for not able to access gcc-4.6.2 automatically (have to access ~/gcc462/bin), I install binary GCC from HPC. So I'm extracted gcc-lion.tar.gz. For my surprise, it's extracted with some hierarchy like usr/local/bin, usr/local/include, … and I supposed to copy it to root folder. In that case, my Xcode4.2's gcc would still intact because it's in /usr/bin .

 I wonder if all gcc compilation result'll stored to /usr/local if we didn't pass any parameter, so I checked my /usr/local/bin directory


Nugrohos-MacBook-Pro:/ nugroho$ cd usr/local/bin/
Nugrohos-MacBook-Pro:bin nugroho$ ls
2to3gfortran python-config smtpd.py
2to3-2.7 idle python2.7 smtpd2.7.py
c++ idle2.7 python2.7-32 x86_64-apple-darwin11.2.0-c++
cpp jcf-dump python2.7-config x86_64-apple-darwin11.2.0-g++
g++ pydoc pythonw x86_64-apple-darwin11.2.0-gcc
gcc pydoc2.7 pythonw-32 x86_64-apple-darwin11.2.0-gcc-4.6.2
gcj python pythonw2.7 x86_64-apple-darwin11.2.0-gcj
gcov python-32 pythonw2.7-32 x86_64-apple-darwin11.2.0-gfortran

There is gcc in it. Is in gcc-4.2?
Nugrohos-MacBook-Pro:bin nugroho$ ./gcc --version
gcc (GCC) 4.6.2
Copyright (C) 2011 Free Software Foundation, Inc.
This is free software; see the source for copying conditions. There is NO
warranty; not even for MERCHANTABILITY or FITNESS FOR A PARTICULAR PURPOSE.

Yes, it is gcc-4.6.2? So, I replace gcc symlink previously  pointed to /usr/bin/llvm-gcc to /usr/local/bin/gcc

Nugrohos-MacBook-Pro:bin nugroho$ which gcc
/usr/bin/gcc
Nugrohos-MacBook-Pro:bin nugroho$ which llvm-gcc
/usr/bin/llvm-gcc
Nugrohos-MacBook-Pro:bin nugroho$ sudo ln -s gc
gcc gcj gcov
Nugrohos-MacBook-Pro:bin nugroho$ sudo ln -s gcc /usr/bin/gcc
Password:
ln: /usr/bin/gcc: File exists
Nugrohos-MacBook-Pro:bin nugroho$ sudo mv /usr/bin/gcc /usr/bin/gccOLD
Nugrohos-MacBook-Pro:bin nugroho$ sudo ln -s gcc /usr/bin/gcc
Nugrohos-MacBook-Pro:bin nugroho$ gcc
gcc: fatal error: no input files
compilation terminated.
Nugrohos-MacBook-Pro:bin nugroho$ gcc --version
gcc (GCC) 4.6.2
Copyright (C) 2011 Free Software Foundation, Inc.
This is free software; see the source for copying conditions. There is NO
warranty; not even for MERCHANTABILITY or FITNESS FOR A PARTICULAR PURPOSE.

Nugrohos-MacBook-Pro:bin nugroho$
Hooray, HPC binary is left untouched, :)

Ubuntu 11.10 Oneiric Ocelot on OS X Lion via Virtual Box

It's long time since my MacBook Pro had ubuntu installed. Curious about new release of ubuntu, I decided to download .iso file via torrent network and installed it on my Mac via VirtualBox as I don't want to dual booting my Mac again (the way I did several years ago).


 I downloaded 64-bit version of Oneiric Ocelot and it's installed without problem.

 From screenshot below, we know ubuntu team has improved their installation method. While the system is busy copying file, we're prompted to fill our detail of instalation; keyboard, time zone, username. Such an efficient method.
From Blogsy Photos
From Blogsy Photos
From Blogsy Photos
From Blogsy Photos
From Blogsy Photos
From Blogsy Photos
From Blogsy Photos
From Blogsy Photos
From Blogsy Photos
From Blogsy Photos
From Blogsy Photos
From Blogsy Photos
From Blogsy Photos

Wednesday, December 14, 2011

Installing GCC 4.6.2 on OSX Lion

After searching how to's, compiling from source, installing Snow Leopard version of Xcode (on its DVD) and installing light alternate gcc 4.2 version without success (or success but not satisfied), I  installed Xcode 4.2 on my OS X Lion. Alas, Apple ship its own GCC compiler, llvm-gcc, instead GCC. So I download tar.gz version of GCC-4.6.2 from GNU and try to install it
From Blogsy Photos
From Blogsy Photos
check to know what dependencies I don't have by typing

./configure


the result is
 

configure: error: Building GCC requires GMP 4.2+, MPFR 2.3.1+ and MPC 0.8.0+.


So, I download it mpc (http://www.multiprecision.org/index.php?prog=mpc&page=download), mpfr(http://www.mpfr.org/mpfr-current/#download) and gmp(http://gmplib.org/). I don't know why gmp's download always ended by error, duh. Trying to 'torrenting' it via burnbit but still get error. I was forced to use ftp connection via Finder (Command-K) and done. Installing these dependencies is easy task, just unzip/untar these archive, cd to its directory and type three magical UNIX installation words.

$./configure
$make
$sudo make install

OK, now it's GCC time. Extract GCC zipped file, cd to its directory

./configure
make
sudo make install

You can add make command to make -j 4 if you have multicore processor and want to make process processed in parallel. "Make" process is very long time process.
Look at gnumake, cc1 , sh , and llvm-gcc-4.2 processes. They're processed in parallel.
From Blogsy Photos
From Blogsy Photos
From Blogsy Photos

 OMG, after long awaiting time, I got an error, something about libgfortran. (update: it's succeed indeed despite of error, it actually compiled gcc but not in Lion path, so Lion's still use llvm-gcc version , I post the update here) After a minute of thinking, I decide to compile just C for now, and build on separate directory and output-ed it on my home directory

Nugrohos-MacBook-Pro:gcc-4.6.2 nugroho$ mkdir build
Nugrohos-MacBook-Pro:gcc-4.6.2 nugroho$ cd build
Nugrohos-MacBook-Pro:build nugroho$ ../configure --prefix=$HOME/gcc462 --enable-languages=c

These command will build GCC on 'build' directory and store the compilation result on gcc462 directory on my home folder. If you are interested in building only a limited set of languages, just like me, you could also specify this option in the configure line. For example if you need only C, C++ and Fortran just append this to the above line: --enable-languages=c,c++,fortran

First Impression of Portable Python

I'm curious about Portable Python I found several days ago even I don't have windows machine. So I borrowed my mom's Pentium III Dynabook Satellite with XP installed, and installed Portable Python in my 8GB Transcend JetFlash USB pendrive. Pathetic though; why do I installed it to pen drive if I already have Windows machine? Yeah, because it can't be installed via my MacBook Pro with Lion of course. Anyway here's some screenshot


From Blogsy Photos
Portable Python can be acessed interactively via command prompt like this
From Blogsy Photos
or throught PyScripter, but we'll face "coud not connect to the python engine server. The remote interpreter and debugger is not available" error because windows's blocking pythonw like this
From Blogsy Photos
From Blogsy Photos
Clicking unblock will allow PyScripter run
From Blogsy Photos

Monday, December 12, 2011

Lorenz Attractor using Python 2.7 and Vpython Module on Mac OS X Lion

From Blogsy Photos
Lorenz attractor's generated by three nonlinear simultaneous equation.

x1=x0+h*a*(y0-x0)
y1=y0+h*(x0*(b-z0)-y0)
z1=z0+h*(x0*y0-c*z0)

 
where

a=10
b=28
c=8./4.

We can play with a,b and c to see the effect.

Here the code to visualize Lorenz attractor on Python. We need VPython module to visualize it.


from visual import *
from operator import mod
jl=1.
h=0.01
a=10
b=28
c=8./4.
x0=0.1
y0=0
z0=0
n=10000.
r=1.
while jl < n:
rate(1000)
rd=mod(n,jl)/1000
sphere(pos=(x0,y0,z0),radius=r, color=(rd,1,rd))
x1=x0+h*a*(y0-x0)
y1=y0+h*(x0*(b-z0)-y0)
z1=z0+h*(x0*y0-c*z0)
jl=jl+1
x0=x1
y0=y1
z0=z1


Since Vpython's not support 64bit platform, we must execute the code using 32-bit python like this

Nugrohos-MacBook-Pro:cellular nugroho$ python2.7-32 lorenz.py

Here the result
From Blogsy Photos

The Journey of Installing Matplotlib Python on Mac OS X Lion (continued)

To install Matplotlib, I have to install numpy first. To install numpy, I need GCC. Lion installer package didn't come with XCode, it has to be downloaded separately from MacAppStore for free. I don't dare to even trying it with my sluggish itnternet connection, so I tried others possibility without success untill I found my SnowLeopard DVD.

Finally, I am able to install GCC. I used XCode 3.2 on Snow Leopard DVD in Lion, :). So, the journey is continue…

Check (just for show off, :))


Nugrohos-MacBook-Pro:mysite nugroho$ gcc
gcc         gcc-4.0     gcc-4.2     gccmakedep  
Nugrohos-MacBook-Pro:mysite nugroho$ gcc

Now install numpy, oh no… look at this.

Last login: Sun Dec 11 19:11:11 from 192.168.2.2
Nugrohos-MacBook-Pro:mysite nugroho$ pip install numpy
Downloading/unpacking numpy
  Downloading numpy-1.6.1.tar.gz (2.6Mb): 2.6Mb downloaded
  Running setup.py egg_info for package numpy
    Running from numpy source directory.non-existing path in 'numpy/distutils': 'site.cfg'
    F2PY Version 2
    blas_opt_info:
      FOUND:
        extra_link_args = ['-Wl,-framework', '-Wl,Accelerate']
        define_macros = [('NO_ATLAS_INFO', 3)]
        extra_compile_args = ['-faltivec', '-I/System/Library/Frameworks/vecLib.framework/Headers']


    building extension "numpy.core._sort" sources
      adding 'build/src.macosx-10.6-intel-2.7/numpy/core/include/numpy/config.h' to sources.
      adding 'build/src.macosx-10.6-intel-2.7/numpy/core/
py/core/include/numpy/__multiarray_api.h']
    building extension "numpy.core.multiarray" sources
      adding 'build/src.macosx-10.6-intel-2.7/numpy/core/include/numpy/config.h' to sources.


error: could not delete '/Library/Frameworks/Python.framework/Versions/2.7/lib/python2.7/site-packages/numpy/__config__.py': Permission denied


It's look like my gcc think it's on Snow Leopard platform, :(. But, there is small hope; the error warning just mentions permission, hm, how about sudo?

ok, let's try again

Nugrohos-MacBook-Pro:mysite nugroho$ sudo pip install numpy
Password:
Downloading/unpacking numpy
  Running setup.py egg_info for package numpy
    Running from numpy source directory.non-existing path in 'numpy/distutils': 'site.cfg'


      adding 'build/scripts.macosx-10.6-intel-2.7/f2py' to scripts
    changing mode of /Library/Frameworks/Python.framework/Versions/2.7/bin/f2py to 755
Successfully installed numpy
Cleaning up...
Nugrohos-MacBook-Pro:mysite nugroho$ 


hm, still in doubt

Nugrohos-MacBook-Pro:mysite nugroho$ python
Python 2.7.2 (v2.7.2:8527427914a2, Jun 11 2011, 15:22:34) 
[GCC 4.2.1 (Apple Inc. build 5666) (dot 3)] on darwin
Type "help", "copyright", "credits" or "license" for more information.
>>> import numpy
>>> 

yeahh…
(don't know if it works as it compiled using GCC designed for Snow Leopard. At least no news is good news, :) )

So here it is

Nugrohos-MacBook-Pro:mysite nugroho$ pip install matplotlib
Downloading/unpacking matplotlib
  Downloading matplotlib-1.0.1.tar.gz (13.3Mb): 13.3Mb downloaded

BUILDING MATPLOTLIB
            matplotlib: 1.0.1
                python: 2.7.2 (v2.7.2:8527427914a2, Jun 11 2011, 15:22:34)
                        [GCC 4.2.1 (Apple Inc. build 5666) (dot 3)]
              platform: darwin
REQUIRED DEPENDENCIES
                 numpy: 1.6.1
             freetype2: found, but unknown version (no pkg-config)
                        * WARNING: Could not find 'freetype2' headers in any
                        * of '.', './freetype2'.
OPTIONAL BACKEND DEPENDENCIES
                libpng: found, but unknown version (no pkg-config)
                        * Could not find 'libpng' headers in any of '.'
----------------------------------------
Command python setup.py egg_info failed with error code 1
Storing complete log in /Users/nugroho/.pip/pip.log
Nugrohos-MacBook-Pro:mysite nugroho$ 

Hm, still long way to go, have to install freetype2 and lbpng. Ugh…


Tux and Beasty

Tux is Linux mascot while Beasty is FreeBSD mascot (have same pronounciation like BSD)

Sunday, December 11, 2011

Creating Django Apps on OS X Lion 10.7.2

As this is my first time using Django, I have to take care of some initial setup. Namely, I’ll need to auto-generate some code that establishes a Django project – a collection of settings for an instance of Django, including database configuration, Django-specific options and application-specific settings.


From the command line, cd into a directory where you’d like to store your code, I use my python directory,then run the following command:
django-admin.py startproject mysite
This will create a mysite directory in my python. Here tho result.
Nugrohos-MacBook-Pro:python nugroho$ pwd
/Users/nugroho/python
Nugrohos-MacBook-Pro:python nugroho$ ls
appender.py distribute-0.6.24.tar.gz graphy graphy.pyc
apprunner.py f.py graphy.py
Nugrohos-MacBook-Pro:python nugroho$ django-admin.py startproject mysite
Nugrohos-MacBook-Pro:python nugroho$ ls
appender.py distribute-0.6.24.tar.gz graphy graphy.pyc
apprunner.py f.py graphy.py mysite
Nugrohos-MacBook-Pro:python nugroho$ cd mysite/
Nugrohos-MacBook-Pro:mysite nugroho$ ls
__init__.py manage.py settings.py urls.py
Nugrohos-MacBook-Pro:mysite nugroho$
These files in mysite directory are:
__init__.py: An empty file that tells Python that this directory should be considered a Python package. (Read more about packages in the official Python docs if you're a Python beginner.)
manage.py: A command-line utility that lets you interact with this Django project in various ways. You can read all the details about manage.py in django-admin.py and manage.py.
settings.py: Settings/configuration for this Django project. Django settings will tell you all about how settings work.
urls.py: The URL declarations for this Django project; a "table of contents" of your Django-powered site. You can read more about URLs in URL dispatcher.
To verify that it works do this
Nugrohos-MacBook-Pro:mysite nugroho$ python manage.py runserver
Validating models...


0 errors found
Django version 1.3.1, using settings 'mysite.settings'
Development server is running at http://127.0.0.1:8000/
Quit the server with CONTROL-C.
Yup, it works…
Try to access http://127.0.0.1:8000 with your browser, :)
Here screenshot from Safari on my Lion


From Blogsy Photos


If we want to show off on other computer, use command below. It will listen on all public IP's

Nugrohos-MacBook-Pro:mysite nugroho$ python manage.py runserver 0.0.0.0:8000
Validating models...


0 errors found
Django version 1.3.1, using settings 'mysite.settings'
Development server is running at http://0.0.0.0:8000/
Quit the server with CONTROL-C.


Here screenshot from my iPad

Django Python Module on OS X Lion 10.7.2

As python programmer, I wish I could build a web using it too. I used to use CMS based portal, but eventually I want python thing in my site. Fortunately, it can be done, using Django.

According it site, Django (https://www.djangoproject.com/) is a high-level Python Web framework that encourages rapid development and clean, pragmatic design.

Developed by a fast-moving online-news operation, Django was designed to handle two challenges: the intensive deadlines of a newsroom and the stringent requirements of the experienced Web developers who wrote it. It lets you build high-performing, elegant Web applications quickly.

So I finally give it a try, it isn't hurt anyway, :). Installing Django in my Python 2.7 on my 13' Macbook Pro with OS X Lion 10.7.2 is fairly easy, using pip from pypi (pypi.python.org/). All I have to do is typing in terminal: pip install django. Of course, we need pip to be installed first.

Nugrohos-MacBook-Pro:python nugroho$ pip django
Usage: pip COMMAND [OPTIONS]


pip: error: No command by the name pip django
(maybe you meant "pip install django")
Nugrohos-MacBook-Pro:python nugroho$ pip install django
Downloading/unpacking django
Downloading Django-1.3.1.tar.gz (6.5Mb): 6.5Mb downloaded
Running setup.py egg_info for package django

Installing collected packages: django
Running setup.py install for django
changing mode of build/scripts-2.7/django-admin.py from 644 to 755

changing mode of /Library/Frameworks/Python.framework/Versions/2.7/bin/django-admin.py to 755
Successfully installed django
Cleaning up...
Nugrohos-MacBook-Pro:python nugroho$python
Python 2.7.2 (v2.7.2:8527427914a2, Jun 11 2011, 15:22:34)
[GCC 4.2.1 (Apple Inc. build 5666) (dot 3)] on darwin
Type "help", "copyright", "credits" or "license" for more information.
>>> import django
>>> print django.get_version()
1.3.1
>>> exit()
Nugrohos-MacBook-Pro:python nugroho$

That's it.


Double Tap Dragging on Lion


I wrote about missing single-tap-hold on Lion to dragging. However, after googling around, I found that it's still has capability to do it, just you will find it at the most unpredictable place in System Preferences

To enable one finger drag by double-tap-hold, go to System Preferences, click on Universal Access, and then the Mouse & Trackpad tab. Click on the “Trackpad Options…” at the bottom section of window. Enable dragging option; we can select the desired dragging behaviour from the drop down list. I wonder why this preference is here, not on trackpad section instead.


From Blogsy Photos

Lion have more Finger Gesture than Snow Leopard


Migrating from Snow Leopard to Lion is confusing and annoying but fun experience. One feature of Lion that I noticed very much is new finger gesture as it's a whole different experience than Snow Leopard.


I noticed first bad feeling when I browsing through Safari and can't double-tap-hold todragging a text to highlight it. I think, oh my God, my trackpad is broken. Calming down, go to preferences panel. I can't find double tap option, hm. Drag n Drop now can be done by three finger, uh. Highlighting text using three finger seems wrong to me. So, no double-tap-hold. (edit: there is double-tap-hold )

Two finger gesture to scroll and zoom is intact. Hm, not really. Scroll direction now has default option to 'natural', iPad like scroll.

No Exposé or Space, just Mission Control. Mission Control contain apps on current active desktop, just like Exposé, and all full screen apps, including other desktop.

Sweeping down four finger now show windows from same apps while sweeping up bring us to Mission Control. Sweeping left or right will bring us to next full screen apps (Desktop's treated as fullscreen apps).

A new gesture is pinching with four finger; pinching down will bring up Launchpad, an apps list just like iOS. A reverse pinching, spread (not sure what it's named), will push all windows to side to show Desktop.

I'm a bit missing the time when I could switch apps by sweeping down my four finger. Moving apps through spaces has gone too, but I guess it's a sacrifice to be able jump too next step.

Operasi Vektor di Python


Di python terdapat operasi dot dan cross untuk array. Namun ketika saya terapkan, ternyata operasi tersebut bukan merupakan operasi vektor melainkan operasi untuk matrik. Mungkin saya yang kurang mempelajari lebih mendalam atau mungkin memang demikian sifat operasi tersebut, akhirnya saya mendefinisikan sendiri operasi dot dan cross untuk vektor menggunakan def (semacam implementasi python untuk function atau procedure).


Berikut adalah contoh perbandingan operasi vektor di python. Kode yang atas adalah operasi bawaan dari Python sedangkan yang bawah adalah operasi dot dan cross dengan definisi yang baru

from numpy import *
from numpy.linalg import *
a=array((4,5,7),float)
b=array((2,3,4),float)
c=array((1,2,3),float)
print 'axb',a*b
print 'bxa',b*a
print 'dot(a,b)',dot(a,b)
print 'c.(axb)',dot(c,(a*b))
print '(bxa).c',dot((b*a),c)
print 'ax(bxc)',a*(b*c)
print '(axb)xc',(a*b)*c
print '(a.c)b-(a.b)c',(dot(a,c)*b)-(dot(a,b)*c)
print 'a=',a,'2a=',2*a
d=7*a+11*b
print 'd',d

def cross(v, w):
x = v[1]*w[2] - v[2]*w[1]
y = v[2]*w[0] - v[0]*w[2]
z = v[0]*w[1] - v[1]*w[0]
return (x, y, z)

def dott(v, w):
return v[0]*w[0] + v[1]*w[1] + v[2]*w[2]

print 'axb',cross(a,b)
print 'bxa',cross(b,a)
print 'dot(a,b)',dott(a,b)
print 'c.(axb)',dott(c,cross(a,b))
print '(bxa).c',dott(cross(b,a),c)
print 'ax(bxc)',cross(a,cross(b,c))
print '(axb)xc',cross(cross(a,b),c)
print '(a.c)b-(a.b)c',((dott(a,c)*b)-(dot(a,b)*c))
print 'a=',a,'2a=',2*a
print '(axb)x(cxb)=b[b.(cxa)]'
print cross(cross(a,b),cross(c,b))
print b*(dott(b,cross(c,a)))


Operasi Matrik di Python


Python dapat melakukan operasi matrik semacam invers, normalisasi, determinan, mencari nilai eigen, trace, bahkan eksponen matrik.


Untuk dapat menggunakan operasi matrik di Python, kita membutuhkan modul numpy.

Berikut adalah contoh kode operasi matrik di python.

from numpy import *
from numpy.linalg import *
a=array(((1,2),(3,3)),float)
b=inv(a)
c=dot(a,b)
d=norm(a)
e=eig(a)
f=det(a)
g=trace(a)
h=exp(a)
i=log(a)
print 'matrik A ='
print a
print 'matrik invers A = B ='
print b
print 'AB ='
print c
print 'norm A ='
print d
print 'eigen A ='
print e
print 'det A ='
print f
print 'trace A ='
print g
print 'exp A ='
print h
print 'log A ='
print i
z=array(((0.0,0.0+1.j),(0.0-1.j,0)),complex)


Perhatikan bahwa python juga mendukung bilangan imajiner sehingga dapat digunakan untuk menghitung matrik kompleks

Menggambar Grafik di Python dengan Matplotlib


Ada beberapa modul di python untuk menggambar grafik, semacam graphy, pycairochart, matplotlib dll. Berikut adalah contoh plot grafik dari y=sin(x) dengan range x dari -10 s.d 10 dengan resolusi 0.1 satuan. Resolusi di sini adalah langkah dari -10 ke 10, jadi kita akan mem-plot sin(-10), sin(-9,9), sin(-9.8), ...


from matplotlib.pyplot import *
from visual import *
x=[]
x=arange(-10.,10.,0.1)
grid(True)
xlabel('Sumbu x')
ylabel('Sumbu y')
title('Jejak ')
plot(x,sin(x),'b-')
batas=10
ylim(-2,2)
xlim(-batas,batas)
show()


The Journey of Installing Matplotlib Python Module on OS X Lion

I need matplotlib to plot my python output when I am running my output function generator python code.

This post is a log of what I did to being able to install matplotlib 1.1.0 on python 2.7.2 on my Mac OS X Lion 10.7.2. Yet, it's unfinished job.


First, googling for matplotlib, sourceforge is official home fon it, but it's very slow, I coudn't even open download page with my sluggish connection. So, I searching other source.

Got it from kambing.ui.ac.id, it has pypi repositories, but when it opened, there is no package, just blank folder.

After further googling, I finally found http://pypi.python.org, pypi stand for python package index.

To be able to use pypi package, we have to install pip first, but before that install distribute using this command

curl http://python-distribute.org/distribute_setup.py | python
curl https://raw.github.com/pypa/pip/master/contrib/get-pip.py | python

and then install matplotlib using pip, there is download activity, but got error at the end; must install numpy first, but it got error too as I didn't have GCC on my lion yet, aaarrrgghh... So, the hell of dependencies is begin...

So here I am, searching for 'light' GCC for my lion. I know I should install XCode 4 from Apple , it's free anyway, but I must face the fact that it's including 4.5GB download job, such a tedious job and wasting time; I just want to install 13 MB matplotlib.

I wish I can type the code below

pip install numpy
pip install matplotlib

(pray)

323f (5) amp (1) android (12) apple (7) arduino (18) art (1) assembler (21) astina (4) ATTiny (23) blackberry (4) camera (3) canon (2) cerita (2) computer (106) crazyness (11) debian (1) delphi (39) diary (286) flash (8) fortran (6) freebsd (6) google apps script (8) guitar (2) HTML5 (10) IFTTT (7) Instagram (7) internet (12) iOS (5) iPad (6) iPhone (5) java (1) javascript (1) keynote (2) LaTeX (6) lazarus (1) linux (29) lion (15) mac (28) macbook air (8) macbook pro (3) macOS (1) Math (3) mathematica (1) maverick (6) mazda (4) microcontroler (35) mountain lion (2) music (37) netbook (1) nugnux (6) os x (36) php (1) Physicist (29) Picture (3) programming (189) Python (109) S2 (13) software (7) Soliloquy (125) Ubuntu (5) unix (4) Video (8) wayang (3) yosemite (3)